Course Guide
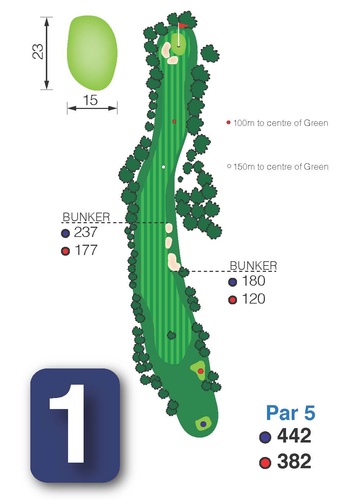
HOLE 1
One of the game's great course designers Dr Alister MacKenzie had a theory that a course's opening hole should lead you into an enjoyable round, rather than punish you from the outset.
This par-5 certainly gives plenty of latitude to start your round strongly – the slight dogleg right fairway is generous in width and the distance from tee to green is far from daunting. The ideal line from the tee is to drive into the right half of the fairway, doing your best to avoid the three sand traps flanking the landing zone.
Long-hitters taking this line can leave themselves a long- or mid-iron into a green protected by two bunkers short and left. For the player, who chooses to lay-up, the right half of the fairway presents the best angle of approach into the putting surface, which has a narrow opening and slopes from right-to-left.
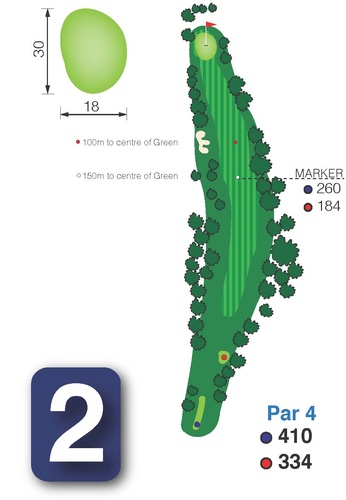
HOLE 2
The gentle opening provided by the relatively short par-5 1st hole might as well be a distant memory as you stand on the tee of this long par-4 – the hardest hole on the course.
The tee shot is blind to an off camber fairway that doglegs left over the crest of a small hill and gradually descends to a bunkerless green.
The best line for your drive is straight along the left edge of the fairway. It is a slightly risky line, given the size of the gum trees that populate the left rough, but a well-struck shot will find the middle of the fairway and shorten the second shot approach to a putting surface that generally slopes from back-to-front and has surrounds that have recently been re-contoured to ask a bit more from the wayward golfer.
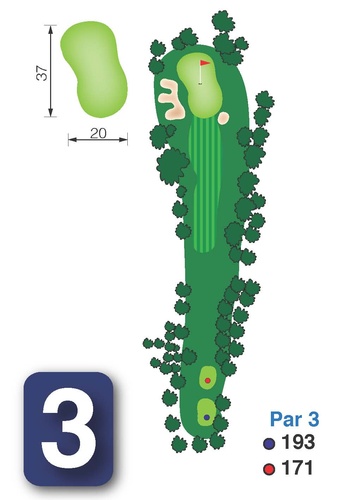
HOLE 3
The toughest hole at Carnarvon is immediately followed by its most testing par-3. The tee is set back in amongst trees and can shelter you from any breeze that is present, which can pose problems for club selection.
Another factor influencing your club selection here is the huge putting surface, where there could be as much as three clubs difference between hitting to a back pin and a forward one. A tee shot avoiding the large sand trap left and the deep pot bunker short and right is to be applauded but only the best-placed shots on this green will be rewarded with a birdie.
If possible, try and leave yourself an uphill putt as the dramatically sloping surface, from back-to-front, is difficult to judge on sidehill putts and downhillers can be lightning fast.
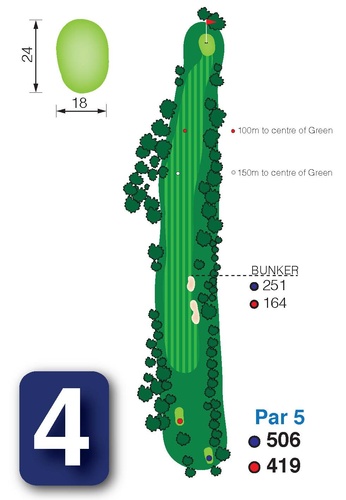
HOLE 4
This is the longest hole at Carnarvon and only the biggest of hitters can reach the narrow putting surface with two mighty blows. From the tee, the fairway descends gradually into a valley.
The driving zone is wide but those seeking a shorter route to the green can take on the pair of fairway bunkers that lie to the right of the short grass and about 245 metres from the back tee.
This is a risky line as a mis-hit can finish among the tall timbers that separate the fairway from the eastern boundary fence.
The second shot is played uphill and for those laying up for a third shot approach, the best line into the bunkerless green is from the right half of the fairway. A steep drop-off from the left edge of the putting surface can make recovery from the left side very difficult.
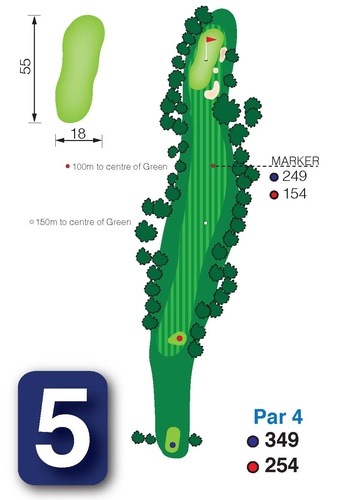
HOLE 5
Regarded as one of the easier par-4s at Carnarvon, the 5th offers a deceptively wide fairway to hit from the tee. However, the longer you are from the tee the narrower the landing area becomes.
It is for this reason that a long iron or fairway metal becomes a good choice for the tee shot. The approach into this green, one of the biggest at Carnarvon, is a real test of club selection and judgement of the breeze.
The putting surface, which generally slopes from left-to-right on approach, measures 54 metres from front-to-back so there is a vast difference in what club you will need to hit your shot close depending on the pin position.
Recent renovations have seen the creation of three bunkers and some grass swales bordering the right and front-right edge of the massive green.
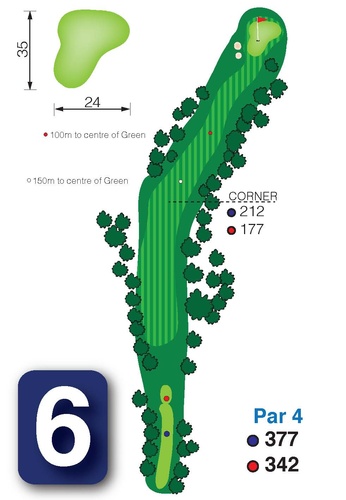
HOLE 6
This is a fabulous risk-and-reward par-4 which provides you with two distinct playing lines from the tee. The conservative play on this dogleg right hole is to play straight down the fairway but be wary that a long hit from the tee can run through the turn and into rough.
The more aggressive play is to hit your drive over the trees on the corner of the dogleg. This not only shortens the hole considerably but, if successful, leaves you on the best side of the fairway for your slightly uphill approach into a massive kidney-shaped green.
This playing angle almost eliminates the impact of a grass bunker and two sand traps, short and left of the undulating putting surface.

HOLE 7
In recent years, a new tee has added length to this par-3 and as a result it has become a formidable one-shotter where par is not easily achieved. Even from the forward markers, this downhill par-3 is no pushover as three deep bunkers guard the front, left and right edges of the relatively small green.
The best possible 'miss' here is slightly long of the green but even then a successful chip and putt is no guarantee.
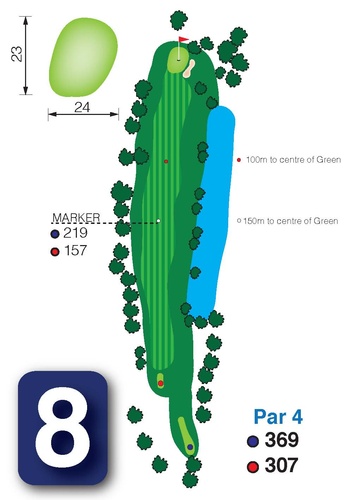
HOLE 8
Here is another of Carnarvon's great driving holes. Recent renovations have seen the construction of a new tee, which has added some angle to the hole and changed the playing line dramatically.
A lake to the right of the fairway was previously a grave for poor tee shots but it is certainly in play now with the ideal driving line cutting across the edge of the water hazard.
A good tee shot into the right half of the fairway will ensure an easier second shot into a small green, which is protected by a deep bunker to the right.
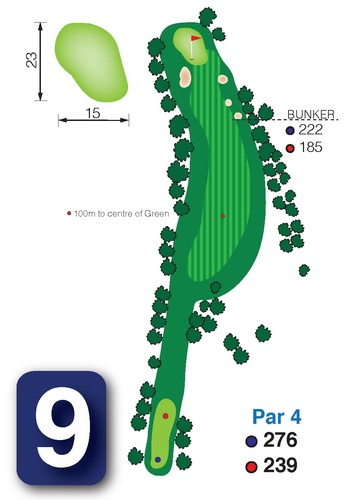
HOLE 9
Long-hitters will like their chances of making at least a birdie here to close out the front nine. But as is the case with all good short par-4s, a double bogey is as likely as a birdie. The fairway doglegs sharply left and any player aiming to find the putting surface from the tee must shape their tee shot to follow the dogleg.
Overdo the shot shape and thick scrub and tall trees left of the fairway lie in wait. Conversely, a tee shot that refuses to bend and stays straight runs the risk of going out-of-bounds or finding one of three pot bunkers through the end of the fairway.
The less risky option from the tee requires a long iron or fairway metal to the right half of the fairway, which will leave a straight-forward pitch to a green that slopes fairly dramatically from right-to-left. The best approach shot left here is any position left of the flag.
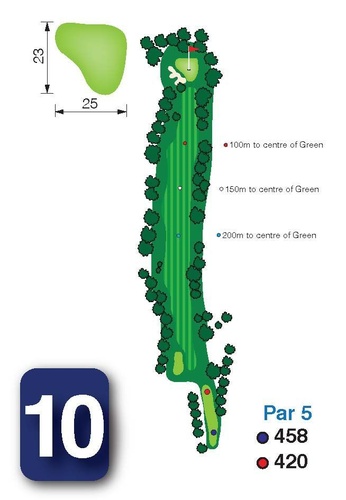
HOLE 10
A wonderful sweeping dogleg right par 5, the 10th , like the 1st, presents a good scoring opportunity to the player who can stay out of all the tall trees that flank both sides of the fairway.
A well struck drive into the left half of the fairway leaves a straight approach shot to the green for the longer hitters as well as an easy lay up option for the shorter hitter.
Players heading for the green with their second shot must thread their ball through a narrow gap between tall timbers left and shrubs to the right. It is a risky play with more than half the green and a large bunker short left of the putting surface hidden from view. The best lay up position is to a plateau in the right half of the fairway.
From here, it is a straight forward pitch into a green that slopes markedly from back left to front right. Putts from above the hole here are generally regarded as the quickest on the course.
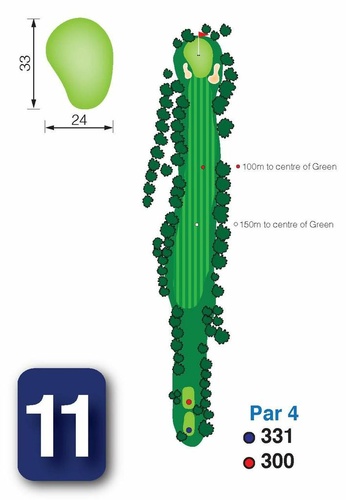
HOLE 11
Smart players leave the driver in the bag on the 11th tee. The straight par 4 is lined by tall stands of gum and pine trees and missing the fairway here in one sure way to make a bogey or worse.
A long iron or fairway metal tee shot will leave a mid iron into a slightly elevated green that is protected by two bunkers, one left and another right. This green has been redesigned in recent times with the front left now incorporating a small shelf and a short false front, while an extension of the putting surface has also been made behind the left bunker.
The result of these changes has created one of the most undulating greens at Carnarvon and ensured greater care should be taken with club selection to leave the easiest possible first putt.
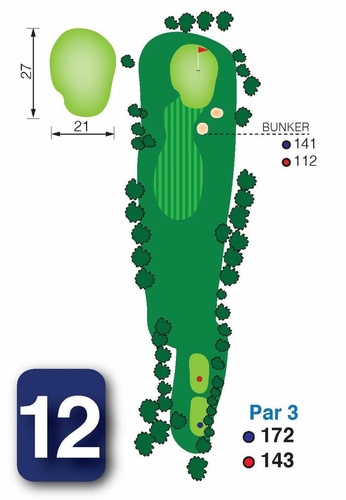
HOLE 12
This par 3 plays slightly longer than the scorecard suggests for two reasons. Firstly, the tee shot is slightly uphill to the green. Secondly, the hole is more exposed than most holes at Carnarvon and is, therefore, more susceptible to wind gusts, especially the prevailing breezes out of south west, which hit you in the face here.
It is recommended you take one more club than usual for the distance and take dead aim at the left centre of the green to avoid the bunkers right of the green.
These bunkers have been redesigned in recent times and are now ominously closer to the putting surface.
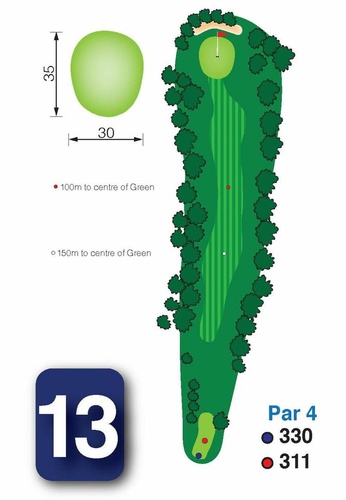
HOLE 13
Terrific driving hole where you can let rip with the driver over the crest of a small hill. Ideally, the best driving line is to left centre of the fairway to avoid the rough, mounds and trees that lie between the short grass and the southern boundary fence.
However, left of the wide fairway is also a no go zone with tall gum trees and the low lying branches of several trees making a successful escape towards the green almost impossible.
Club selection, again, is important here as this is the highest, most exposed point on the course and there is a large bunker hidden from view behind the wide, undulating green.
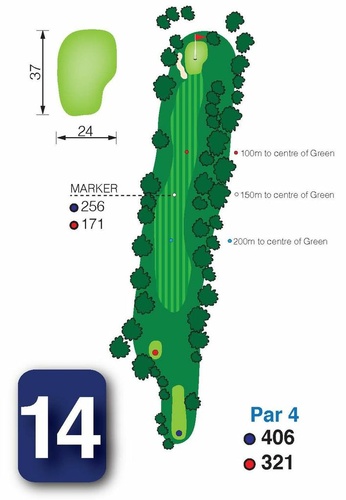
HOLE 14
Another of Carnarvon's strong driving holes. The fairway sweeps down from the tee into a valley before veering slightly right and heading up to the green.
The fairway is generously wide between tall stands of trees left and right with only the very poor tee shots being in danger of flying out of bounds to the right.
A well stuck drive will leave a mid or long iron approach for many players into a two tiered green that is protected by a bunker left and large mound to the right.
It is important to hit your approach onto the same level as the flag to avoid a long. curling putt up or down the step, which runs through the heart of the green.
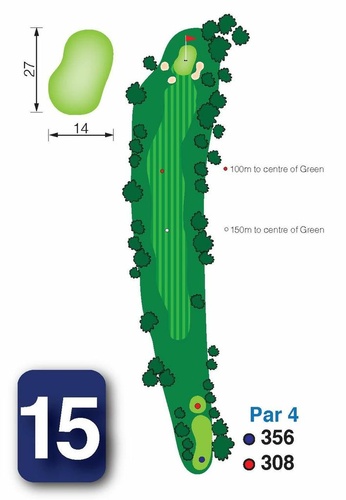
HOLE 15
The 15th is a deceptively tough hole that demands respect from tee to green. The dogleg right hole calls for a good drive into the left half of the fairway.
Miss the fairway right and there are plenty of trees and two newly created mounds to contend with.
More trees to the left of the driving zone ensure your second shot will be a chip out to the fairway. The mid or short iron second shot needs to be precise to avoid the bunkers left and right of the putting surface, which generally slopes from right to left. A recent redesign of the apron and the three green side bunkers has reduced the margin for error on your approach shot.
The opening into the green is quite narrow and the fairway is tightly trimmed around the bunkers making them easy targets for the slight mis-hit.
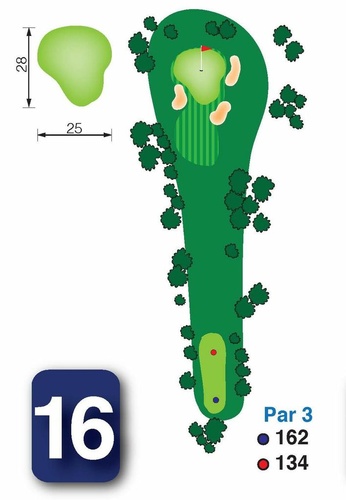
HOLE 16
This is the shortest hole at Carnarvon but the premium placed on accuracy here is great. A narrow stretch of fairway linking tee to green is framed by heavy scrub and trees, while two bunkers right and one to the left catch even the slightest mis-hit tee shot.
The most difficult pin position to reach with your tee shot is in the front third of the pear shaped green and is best avoided. Play to the 'far' back half of the green and take two putts for your par.
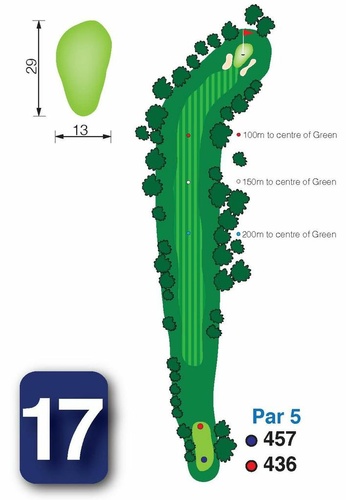
HOLE 17
This hole, given the difficulty of the closing hole, should be known as the 'Last Hurrah'. Despite being played slightly uphill, longer hitters will find the green is in range for their second shots if they can avoid the trees left and right of the fairway with their tee shot. The first two thirds of the journey from tee to green are relatively straight but then the fairway doglegs sharply right.
From back down the fairway, only the flag is visible beyond the trees on the corner of the dogleg. The narrow green is protected left and right by bunkers but the temptation of an eagle attempt or two putt birdie will be too strong for those able to cover the distance from tee to green in two hits.
Shorter hitters can also chase a birdie here by simply playing smart. The ideal line from the tee is into the left half of the fairway to open up the playing line to the green.
Aim to get past the corner of the dogleg with your lay up shot and this will leave little more than a pitch into the green. It is important to note that the green slopes generally from left to right on your approach so try and leave your third shot below the flag for your best chance of making a birdie putt.
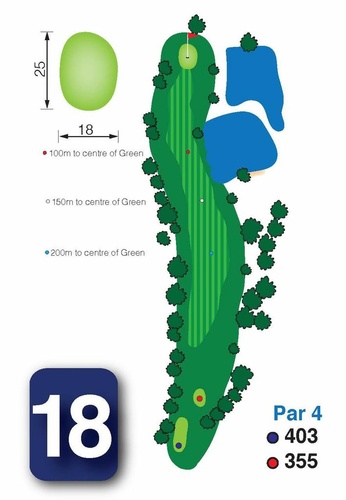
HOLE 18
This hole ranks as one of the best closing par 4′s in Sydney. From the tee, a large lake is in your line of sight and is certainly reachable for strong hitters.The best driving line is into the left half of the fairway, which straightens out the slight dogleg left hole. This hole is all about the drive. Get your drive in play and you can be confident of at least making par.
If successful with your drive, you will be left with a long or mid iron into a bunkerless green that features a false front and a steep drop off slope to the right.
The best possible 'miss' here is left of the green where the tighlty trimmed surrounds will allow you to putt or chip your ball close.